Pages

Monday, December 22, 2014

A Note About Hats

The first time I crocheted a hat, I noticed it was looking like it had corners instead of being a circle.  I was really new at crocheting and wasn't sure if I was doing something wrong.  I worked with a person who crocheted, so I asked her about it.  She asked me if I was staggering the increases, to which my reply was, "huh?".  I said I was following the pattern, and the way the increases lined up made an octagon shape.  She told me that everyone knows you are supposed to stagger the increases, they just write patterns that way for convenience (not sure if she meant the attitude, but it certainly came across).  So, in case no one has told you about this little trick, I will show you a way to keep your hat a circle through the increase rounds (not that it is really that important because it will look like a circle after the increase rounds, but this will eliminate any corners that may form).

There isn't really a trick involved - it is just a matter of changing where you place your increases each round.  This will work for any basic crochet hat that uses the same stitch all the way through (no cables or clusters or shells...follow the pattern with those).  All hats begin the same way - with a ring that you crochet so many stitches into (lets say 8).  Then, for so many rounds you must increase stitches to get the hat bigger.  Usually the increase in each round is equal to the number you first started with, in this case 8.  So each round after the first you would increase 8 stitches at even intervals.  Patterns are usually written so you do the increases like this:
         Round 1: SC 8 into ring
         Round 2: 2 SC in each stitch around
         Round 3: (2 SC in first stitch, 1 SC in next) repeat around
         Round 4: (2 SC in first stitch, 1 SC in next 2) repeat around
         Round 5: (2 SC in first stitch, 1 SC in next 3) repeat around
And on and on like this until the increase rounds are done.

Increasing this way will cause corners where the increases are and you will see lines coming out from the center of the hat.  To avoid this, instead of doing Round 4 like (1,2), 3, 4, (1,2), 3, 4... do 1, (2,3), 4, 1, (2,3), 4 ... and Round 5 like 1, 2, 3, (4,5)... and Round 6 like 1, 2, (3,4), 5, 6... and Round 7 like (1,2), 3, 4, 5, 6, 7... Still keep the increases evenly spaced throughout the round, but change it so they never line up over the increase from the previous round.  This will give you a circle shape with no corners or lines.

Here is an example from my Timeless Hat pattern:
The square on the left was crocheted as written in the pattern (see the lines that make an "X"?), and the circle on the right was crocheted by staggering the increases (no corners, no lines).  This example is a little extreme because most hats would make closer to an octagon shape, but the way the increases are in this particular pattern, you get a square.  And if you worked it up that way, it would be fine.  It would still be a circular hat at the end, but you would possibly see 4 corners sticking out of the top of your head that I'm not sure would mellow out after washing. 

Thursday, December 4, 2014

Peppermint Candy Hat

I recently remembered an afghan I saw in a book from the library that was made up of what looked like those peppermint candy swirls.  I thought it would make cute as a hat.  The problem is, I have looked at like a thousand pattern books, so who the heck knows which one the pattern was in. So, off I went trying to create it on my own.

I assumed it was made by changing colors every few stitches, so that is what I tried first.  I couldn't even get through the 3rd round doing it that way.  Dropping the yarn and picking up the new color every couple stitches drove me crazy.  I just wasn't able to get into the rhythm of it.  I nixed that idea and found a way to work it where I would only change colors once per round.  It is probably not the most conventional way to make this, and it uses more yarn than necessary, but it was a much more pleasant experience and it looks great (which is really all that matters).


The look is achieved by working the colors into the stitch of the same color and chaining past the stitches of the alternate color.  Then switch colors on the next round, push the chain stitches to the back, and work into the stitches that were ignored during the last round.  


Keep your chains looser so the hat won't lose its stretch.  The extra chains at the end of each round are to get you to the right place for the beginning of the next round.   Make sure to pull the dropped yarn tight after making the first stitch with new color.


If I were going to sell this, I would line the inside because it is a bit unsightly.  But it is for my baby niece, and I know my sister-in-law won't mind.  I just hope it fits well.  I have it on a ball that measures 18" around and it is just about stretched all the way while still being comfortable.


Peppermint Candy Hat
 
(Baby size only, should fit 16-18" head)

Materials:
Caron Simply Soft, color White 
Caron Simply Soft, color Harvest Red 
Bernat Pipsqueak, color White (for the trim)
size I 5.5mm crochet hook 
stitch marker (optional)
yarn needle

Abbreviations:
CH - chain
SC - single crochet
HDC - half-double crochet
SS - slip stitch

Make a ring
Round 1: With Caron White, (HDC 1, CH 1) 6 times in ring.  SS in first HDC made, SS to first CH space of the round.  DON'T pull ring closed yet.  12 sititches

Round 2: With Red, CH 1, (HDC down into ring, CH 2) 6 times.  SS in first HDC made, SS in first CH space of the round.  Can close ring now.  18 stitches  

Round 3: With White, CH 1, working in front of the chain from previous round from now through the rest of the pattern, (2 HDC in HDC, CH 2) around. CH 2, SS in first chain space of the round,  24 stitches

Round 4: Red, CH 1, (2 HDC in HDC, CH 3) around.  CH 2, SS in first chain space of the round.  30 stitches

Round 5: White, CH 1, (2 HDC in first HDC, 1 HDC in next, CH 3) around.  CH 3, SS in first chain space of the round.  36 stitches

Round 6: Red, CH 1, (2 HDC in first HDC, 1 HDC in next, CH 4) around.  CH 3, SS in first chain space.  42 stitches

Round 7: White, CH 1, (2 HDC in first HDC, 1 HDC in each of next 2 HDC's, CH 4) around.  CH 4, SS in first chain space.  48 stitches

Round 8: Red, CH 1, (2 HDC in first HDC, 1 HDC in each of next 2 HDC's, CH 5) around.  CH 4, SS in first chain space.  54 stitches

Round 9: White, CH 1 (2 HDC in first HDC, 1 HDC in each of next 3 HDC's, CH 5) around.  CH 5, SS in first chain space.  60 stitches

Round 10: Red, CH 1 (2 HDC in first HDC, 1 HDC in each of next 3 HDC's, CH 5) around.  CH 5, SS in first chain space.  60 stitches

Round 11: White, CH 1, (HDC in each of 5 HDC's, CH 5) around.  CH 5, SS in first chain space.  60 stitches

Round 12: Red, CH 1, (HDC in each of 5 HDC's, CH 5) around.  CH 5, SS in first chain space.  60 stitches

Rounds 13 - 28: Repeat rounds 11 and 12

Round 29: White, CH 1, (HDC in each of 5 White HDC's, SC in each of 5 Red HDC's) repeat around.  60 stitches

Round 30:  With Pipsqueak White, CH 1, 1 HDC in each stitch around.  60 stitches (You may want to use a stitch marker to mark beginning of next round.)

Round 31: CH 1, (1 HDC in 8 stitches, HDC 2 together) repeat around.  54 stitches

Round 32: CH 1, 1 HDC in each stitch around.  54 stitches

Done!  Fasten off and weave in those ends.  

And if anyone knows where to find the afghan pattern I was talking about, please post it in the comments.  Thanks!


Wednesday, November 19, 2014

Finishing the Unfinished

Looking for something quick to finish before my son is off school next week.  So, I figure this is the perfect time to pick up something that has been laying around unfinished.  I found a Kindle cover I had started making that just needed to be sewed up.  


I had made the same exact cover for my mom a while back, and one of her friends said she really liked it.  So I started to make one as a present - LAST YEAR.  It is very easy to never finish something when no one even knows you are making it.  I should start keeping things on display until they are completed so people can bug me about finishing them.

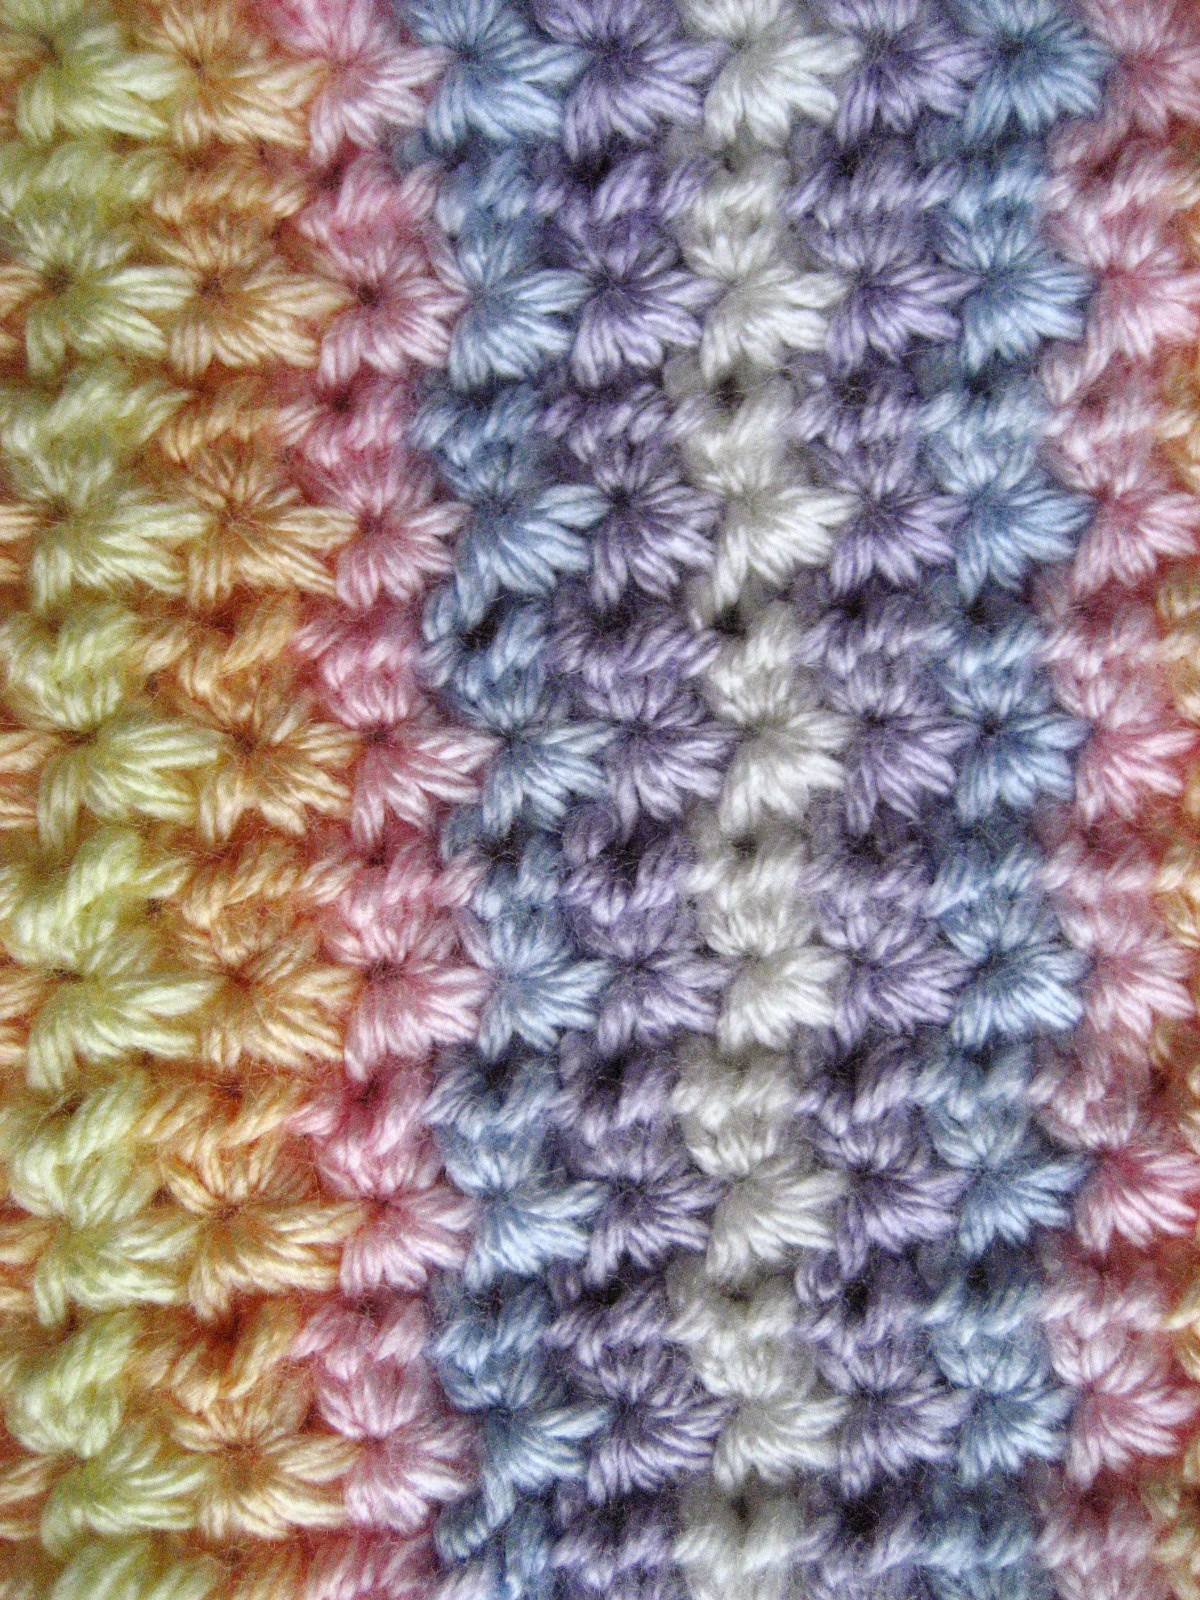
I came up with this pattern when I was playing around with the star stitch with some Caron Simply Soft in the color Baby Brights Ombre.  I found if you do it just right, you get nice stripes without having to do color changes (no color changes = much fewer ends to weave in = I'm a happier person).  

I love the way it came out, but, the project is harder than it should be.  The stitch pattern itself is quite simple, but the coloring of the yarn made it a bit cumbersome.  The yellow and orange sections of yarn are just a bit longer than the rest (you can see how the yellow stripes kind of bow out in the picture), so you have to really play with your tension to get the striped effect. 

All you do is make a rectangle by crocheting the star stitch.  If you have never done the star stitch before, I will tell you it is very easy once you learn it.  It is made through a combination of 2 rows. Once you learn the 2 rows, you are good to go. There are many tutorials online that show how it is done.  Unfortunately, they are are some differences depending on where you look.  This is how I did the star stitch:

Make a foundation chain in a multiple of 2 plus 3 extra
ROW 1:
Beginning star:   Insert hook into 2nd chain from hook, yarn over and pull up a loop. Keep both loops on the hook.  Insert hook into next chain, yarn over and pull up a loop.  Keep three loops on hook.  Continue this way in the next 3 chains.  You now have 6 loops on hook. Yarn over and pull through all 6 loops.  Chain 1 to close the stitch. 
Rest of stars to end of row:  To start the next stitch (and each stitch after), insert your hook into the center of the star just made (where you just chained 1), yarn over and pull up a loop, keeping both loops on hook.  Next, insert hook under the last spoke of the star just made (actually going through the stitch), yarn over and pull up a loop, keeping 3 loops on hook.  Then insert hook into same chain that the last spoke of previous star used, yarn over and pull up a loop, keeping 4 loops on hook.  Then insert hook into each of the next 2 chains, yarning over and pulling up a loop as you go.  Yarn over and pull through all 6 loops on hook.  Chain 1 to close stitch.  Continue this way making stars until last chain in row.  1 HDC in last chain.  Turn.
Row 2 and all even numbered rowsChain 2.  2 HDC's in each center of star across.  1 HDC in last stitch in row  (which is the first spoke of first star in previous row).  Turn.
Row 3 and rest of odd numbered rows:  Chain 3.  Insert hook into 2nd chain from the hook and pull up a loop.  Pull up a loop through the next chain and next 3 stitches, keeping all loops on hook.  Yarn over and pull through all 6 loops on hook.  Chain 1 to close the stitch.  As done in row 1, start the next stitch (and each stitch after) by inserting hook into center of star just made and pulling up a loop.  Pull up a loop through last spoke of star just made.  Pull up a loop through same HDC the last spoke of previous star used.  Pull up a loop through each of next 2 HDC's.  Yarn over and pull through all 6 loops on hook.  Chain 1 to close stitch.  Continue making stars along row until reaching the last stitch (the chain 2 from previous row).  1 HDC in last stitch.  Turn.
Rows 4 - end:  Continue alternating rows 2 and 3, ending with row 2. 

You will see that the pattern actually makes the color stripes go vertically.  I made my piece wider and shorter because I wanted the stripes to go horizontally when I sewed it all together (the picture of the long rectangle is the piece turned sideways).

For this particular piece, I used Caron Simply Soft color Baby Brights Ombre.  With a size G hook, I made a chain of 113 so that last chain on the hook is the beginning of the purple segment after the white And I worked through 20 rows.  After completing the rectangle, I attached white yarn to the white edge and put (SC, 2HDC, SC) in the spot that lined up with the center of each star across to make a nicer edge.  I then folded it so the stripes lined up from front to back and sewed it together, leaving a flap at the top to fold over.  When I made my mom's, I made a band to tuck the flap into, but I think I will just put a couple buttons on this one.

You can make other sized objects as well, just turn the work at the right color.  The color pattern is: yellow, orange, pink, blue, purple, white, purple, blue, pink, orange, yellow, orange... The color pattern turns on itself at yellow and white, so that is where you need to turn the object you are making to keep the rows.  But keep in mind that this stitch creates a denser, stiffer fabric.

Can you use other variegated yarns and achieve the same results?  I don't know.  The color pattern of the yarn would have to reverse itself like Caron's does.  And Caron's color segments each measure about 6" when pulled tight, so if the segments of another yarn match up, it should work, or change your hook size to make it work.  

Thursday, November 13, 2014

Happy Birthday, Sis!

Since I already had some purple yarn out for that owl hat, I figured it would work up into a great hat for my sister.  I planned on it being a Christmas present, but since I finished it in time (and since I have no self control), I decided to give it to her as a birthday present.  I absolutely LOVE it! 
Now, the pattern for this hat looks a bit wordy and confusing, but I promise you it is super easy.  So, don't scroll down to the free pattern yet.  Let me explain something first.  This is the kind of pattern where you can see what you are supposed to do while you are doing it (you may find you don't really need the pattern anymore once you get going).  For the most part, everything is done in the same place from previous rounds: FPDC's go around FPDC's, V-Puff's go into V-Puffs, ESC's in ESC's.  So after the increases, it is really a simple pattern -  3 ESC's, 2 FPDC's, 3 ESC's, V-Puff...  


But what the heck is an ESC?  I know!  This is the first time I have ever needed to use an extended single crochet stitch.  It is basically a stitch that starts like a single crochet, but finishes kinda like a double.  
EXTENDED SINGLE CROCHET:
1.) Insert your hook into the specific stitch, pull up a loop, and yarn over (just like single crochet)
2.) But now only pull that yarn over through 1 loop on your hook, not both (2 loops left on hook).
3.) Then you yarn over again and pull through both loops on your hook.  

I had to use the ESC because the half-double and double crochet didn't work for me.  The half-double makes everything go on a diagonal when worked in the round, which I didn't want for this hat.  And the double crochet was too tall and made the FPDC ribs curl.  Now, the double crochet stitch might work for others, as we all use our hook a bit differently, but for me it was too tall.  So if you would rather try that then go ahead, but the ESC is really easy to do.

FRONT-POST DOUBLE CROCHET:
1.) Yarn over and on the right side of the designated stitch, insert hook from the front of your work through to the back.  Go around the stitch you are working by bringing the hook back out to the front and on the left side of the stitch.  The "post" of the stitch will be on your hook.
2.) Pull up a loop by yarning over and pulling your hook out of the stitch.
3.) Yarn over and pull through only 2 loops on hook
4.) Yarn over and pull through 2 remaining loops on your hook.


There are conflicting instructions on how to do a Puff stitch, so, just to make sure there is no confusion, this is how I do the Puff stitch for this hat.  
PUFF STITCH
1.) Yarn over, insert hook into designated stitch, pull up a loop (3 loops on hook), 
2.) Yarn over again, re-insert hook into same stitch, pull up a loop (5 loops on hook), 
3.) Yarn over again, re-insert hook into same stitch again, pull up a loop, (7 loops on hook), 
4.) Yarn over and pull through all 7 loops on your hook. 
5.) Chain 1 to close the stitch.


To make the V-PUFF starting in round 6 (see picture at the end of pattern): 
1.) Insert hook in chain space between the 2 puffs from 2 rounds previous
2.) Make a puff stitch
3.) Chain 1 more time
4.) Make another puff stitch in same place


One final thought; this hat was made to be a bit slouchy, not too much.  If you want it slouchier, just make it longer by repeating the pattern rounds a couple more times.  If you don't want it to slouch at all, but rather have a tighter fitting hat, I would suggest stopping at round 21 (maybe 23) and then moving on to the ribbing.  

Here we go with the free pattern.  There are pictures at the end to help with any confusion.

MEGHAN'S HAT (Adult size only)

Materials:
1 skein Caron Simply Soft, color Plum Perfect
size H 5mm crochet hook 
size E 3.5mm crochet hook
stitch marker (optional)
yarn needle

Abbreviations:
CH - chain
SC - single crochet
ESC - extended single crochet
FPDC - front post double crochet


Using H hook, Make a ring
Round 1: SC 8 into ring, join in first sc made.  DON'T pull the ring all the way closed yet.

Round 2: CH 3, *Puff stitch into ring, CH 1 again* 6 times.  Join into top of first Puff made.  Now pull the ring closed.  6 Puff stitches made.  If you want to count the stitches, you should have 17. 

Round 3: CH 1, ESC in same stitch, 2 ESC's in Chain space, *ESC in top of next Puff stitch, 2 ESC's in next Chain space* repeat around.  Join in first ESC.  18 stitches.

Round 4: CH 3, Puff stitch into Chain space from round 2, CH 1, Puff stitch into same space, CH 1, *Puff stitch into next Chain space, CH 1, Puff stitch into same space, CH 1* repeat around.  Join into top of first Puff made.  12 Puff stitches made.  35 stitches.

Round 5: Ch 1, ESC in same stitch, 2 ESC's in Chain space, *ESC in top of next Puff stitch, 2 ESC's in next Chain space* repeat around.  Join in first ESC.  36 stitches.

Round 6: Slip stitch into next stitch, CH 1, 2 ESC's in same stitch as chain, 2 ESC in next stitch, skip next stitch, (Puff stitch into Chain space from round 4, CH 1, Puff stitch into same space - this creates the V-Puff), skip the next stitch, *2 ESC's in each of next 2 stitches, skip next stitch, V-Puff in next Chain space from round 4, skip next stitch* repeat around.  Join in first ESC.  6 V-Puffs made.  54 stitches.  (see picture below)

Round 7: CH 1, 2 ESC into same stitch as chain, FPDC around each of next 2 stitches, 2 ESC's in next, skip next, ESC in top of Puff, 2 ESC's in Chain space, ESC in top of next Puff, *2 ESC's in next stitch, FPDC around each of next 2 stitches, 2 ESC's in next stitch, skip next, ESC in top of Puff, 2 ESC's in Chain space, ESC in top of next Puff* repeat around.  Join into first ESC.  60 stitches.  (see picture below)

Round 8: CH 1, 2 ESC's in same stitch as chain, ESC in next stitch, FPDC around each of next 2 FPDC's, ESC in next stitch, 2 ESC's in next stitch, skip next stitch, make V-Puff in chain space from round 6, skip next stitch, *2 ESC's in next stitch, ESC in next, FPDC around each of next 2 FPDC's, ESC in next stitch, 2 ESC's in next stitch, skip next, V-Puff in chain space, skip next stitch* repeat around.  Join into first ESC.  78 stitches.

Round 9: CH 1, ESC in same stitch as chain, ESC in each of next 2 stitches, FPDC around each of next 2 FPDC's, ESC in each of next 3 stitches, skip next, ESC in top of Puff, 2 ESC's in chain space, ESC in top of next Puff, *ESC in each of next 3 stitches, FPDC around each of next 2 FPDC's, ESC in each of next 3, skip next, ESC in top of Puff, 2 ESC's in chain space, ESC in top of next Puff* repeat around. Join into first ESC.  72 stitches.

Round 10: CH 1, ESC in same stitch as chain, ESC in each of next 2 stitches, FPDC around each of next 2 FPDC's, ESC in each of next 3 stitches, skip next, V-Puff in chain space from 2 rounds previous, skip next stitch, *ESC in each of next 3 stitches, FPDC around each of next 2 FPDC's, ESC in each of next 3 stitches, skip next, V-Puff into chain space, skip next* repeat around.  Join into first ESC.  78 stitches.

Rounds 11-25: Repeat rounds 9 and 10, ending with row 9.

Round 26: Change to E hook.  Slip stitch into next stitch, CH 1, ESC in same stitch as chain, ESC in next stitch, FPDC around each of next 2 FPDC's, ESC in each of next 2 stitches, FPDC around each of next 2 stitches, ESC in each of next 2 stitches, FPDC around each of next 2 stitches.  This creates the ribbing.   Repeat *2 ESC's, 2 FPDC's* all the way around .  Join in first ESC.  72 stitches.

Rounds 27-32: CH 1, ESC in same stitch as chain, ESC in next stitch, FPDC around next 2 FPDC's, *ESC in each of next 2 ESC's, FPDC around each of next 2 FPDC's* repeat around. Join in first ESC.  72 stitches.

Done!  Fasten off and weave in those ends.  

Starting with round 6 and rest of even rounds until ribbing, to make the V-Puff:

Skip the ESC that was worked into the top of puff.

Insert hook into chain space and work the V-Puff over top the the 2 ESC's in that space.  

Skip the ESC from the top of second puff.  
Continue with ESC as written in pattern.


The puff stitch is really a modified half double crochet with an extra chain to close it, which creates 2 stitches.  The chain to close it is at the top of the puff, with the technical hdc stitch being pushed to the right and kinda hanging out unattached to anything.  Making the V-puff in this pattern will result in 5 stitches (each puff creating 2 and the extra chain 1 in the middle):


1 is technically the 1st puff stitch
2 is the chain to close
3 is the chain 1
4 is the 2nd puff stitch
5 is the chain to close

Always skip #1, so the stitch count will not be consistent, even after the increase rounds.


Starting with round 7 and rest of odd rounds until ribbing, to work ESC's in to the V-Puff:

Skip stitch #1
ESC in #2
2 ESC's in space created by #3,4 
ESC in #5

Continue with ESC as written in pattern


So, I hope you made it through without too much trauma.  That was incredibly confusing for me to write up, but I really tried to make it as clear as possible.  If I have failed, let me know and I will figure out a better way of explaining everything, because it is an AWESOME hat, and it is actually pretty fun to make.

Thursday, November 6, 2014

Yet Another Owl Hat


Well, I decided to make an owl hat out of that eyelash-ish yarn from the previous post.  I was hoping to be a bit more creative, but it just wasn't working this time.  It is pretty cute, though.  

I used Palette Collection Series 001pt/219 in color Lilac Wine, which I believed is discontinued. Holding that together with Caron Simply Soft in color Plum Perfect, I just made a typical beanie using a size N hook.  I tried it with the tassels for "ears" but it didn't look right with this yarn.  I am giving it to my niece, so I will see how it looks once it's on.  Probably won't be a good hat for the winter because the large hook made for some good size holes, but it should be good for the next month or two. 

This hat used up a little more than 1 out of the 3 balls from my stash, so there are 2 left to be dealt with, but that is for another time.

Monday, October 6, 2014

There Should be Warnings on the Label

I think it's about time to pick out something from my stash that I have been avoiding.  I have more than a few types of yarn that I regret buying.  Most were bought when I first decided I was going to learn how to knit.  I went to the store and got all sorts of novelty yarn - they looked so cool and funky.  I had no direction, no one to tell me "Stop!  You have no use for that".  

I remember practicing my knit stitch using an eyelash yarn, thinking I was making a scarf.  But, to my surprise, I was actually making a feather boa.  I was so disappointed.  As a newbie, I really didn't understand that if you have a ball yarn that looks like a feather boa, and you garter stitch the whole stinkin' thing, you will have knit yourself a feather boa. 

So, as part of my de-stashing project, I am going to have to use these yarns.  I don't want to wait until they are all I have left, so I will periodically pick something out and come up with some use for it.

First up is Palette Collection Series 001pt/219.  The color is called Lilac Wine.  


It has two different strands of yarn? twisted together.  I did a google search for it, but it looks like it is discontinued.  So... I guess it's a good thing I have 3 balls of it. 


It is a nice color, though.  I remember thinking when I bought it that I would make something for my sister with it, as she loves purple.  So, I think I will stick with that, maybe make her a purse or something.  I have some other purple yarn that maybe I can pair up with this.  Ugh, I don't know.  Anyway, I am giving myself a 1-month deadline to come up with some sort of finished object.  (Why did I buy 3 balls of this?)


Saturday, October 4, 2014

A Christmas Bonnet?

Since I have a sweater to knit that should have been done by the end of summer, I decided to work on something completely different.  (I will talk about that sweater in a future post, I just can't bear it right now.)  I figured I should get a jump on Christmas presents.  My sister-in-law, Jess, always looks fantastic in hats, so I figured that would be a good place to start.

Now Jess loves anything old-timey (is that a term?).  She is really in to Jane Austen books, Gone with the Wind, anything Titanic related - all that kind of stuff.  So I tried to keep that in mind as I decided what to do.  I picked out a couple of pretty colors from my stash and set to work.  This is the result:


It looks a bit more Easter bonnet-ish than I would have liked for a Christmas present, but I don't really know what I was expecting since I picked out 2 spring colors.  My brain must be subconsciously rejecting the onset of winter.  I do like the hat, though.  I might try to do it again in different colors, something more fitting for the occasion.

It's basically just a typical single crochet hat, but instead of doing a single crochet in each stitch, it is a single crochet, chain 1 in each chain 1 space.  And since you are skipping all the single crochet stitches, you are essentially only single crocheting half of the hat, the other half is chain 1's, so it gets done pretty quickly.  It also looks alot smoother and is less "holey" than a regular single crochet hat, but I don't think it has as much horizontal stretch.

It is made without joining the rounds for a seamless look.  I will avoid seamed hats at all cost.  I don't know why they bother me so much.  Every other article of clothing in the world has seams somewhere, but it just drives me crazy seeing that line run down the back of a crochet hat (even though non-crocheters claim they don't see it).  Since I already planned on putting a flower on this hat, I knew I could work it in a spiral , as the flower placement would cover the jog in the color change.  Anyway, I will stop jabbering on and get to the free pattern.

A Timeless Hat


Abbreviations:
SC - single crochet
CH - chain

Materials:
Less than 1 skein of Caron Simply Soft color Woodland Heather (color A)
Small amount of Caron Simply Soft color Victorian Rose (color B)
Size H 5mm crochet hook
Size I 5.5mm crochet hook
Size J 6mm crochet hook
Stitch marker
Yarn needle

Gauge: 6" across circle at end of round 15 (if you have a square at the end of this round, it should measure about 5-3/4" from side to side.  Also, see my post on how to make it a circle.)

Try to keep your chains loose, especially on the increase rounds, as it will help you get the hook in the right spot.

Child and Adult size
With color A and size "H" hook, Make a ring
Round 1: SC 8 into ring, do not join.  For the rest of the rounds, place your stitch marker in the first SC of each round so you know where the round begins.
Round 2: (SC, CH 1) in each SC around - 16 stitches
Round 3: (SC, CH 1) twice in CH 1 space, (SC, CH 1) once in next CH 1 space.  Repeat around - 24 stitches
Round 4: (SC, CH 1) twice in CH 1 space, (SC, CH 1) once in next 2 CH 1 spaces.  Repeat around - 32 stitches
Round 5: (SC, CH 1) twice in CH 1 space, (SC, CH 1) once in next 3 CH 1 spaces.  Repeat around - 40 stitches
Round 6: (SC, CH 1) twice in CH 1 space, (SC, CH 1) once in next 4 CH 1 spaces.  Repeat around - 48 stitches
Round 7: (SC, CH 1) twice in CH 1 space, (SC, CH 1) once in next CH 1 spaces.  Repeat around - 56 stitches
Round 8: (SC, CH 1) twice in CH 1 space, (SC, CH 1) once in next CH 1 spaces.  Repeat around - 64 stitches
Round 9: (SC, CH 1) twice in CH 1 space, (SC, CH 1) once in next CH 1 spaces.  Repeat around - 72 stitches
Round 10: (SC, CH 1) twice in CH 1 space, (SC, CH 1) once in next CH 1 spaces.  Repeat around - 80 stitches
Round 11: (SC, CH 1) twice in CH 1 space, (SC, CH 1) once in next CH 1 spaces.  Repeat around - 88 stitches
Round 12: (SC, CH 1) twice in CH 1 space, (SC, CH 1) once in next 10 CH 1 spaces.  Repeat around - 96 stitches.  If making an adult's size hat, stop here and continue to Adult Round 13 below
Rounds 13-25: (SC, CH 1) once in each CH 1 space around - 96 stitches
Rounds 26-31: Change to color B, (SC, CH 1) once in each CH 1 space around - 96 stitches
Round 32: Change back to color A, (SC, CH 1) once in each CH 1 space around - 96 stitches
Rounds 33-34: Switch to "I" size hook, (SC, CH 1) once in each CH 1 space around - 96 stitches
Rounds 35-39: Switch to "J" size hook, (SC, CH 1) once in each CH 1 space around - 96 stitches

Slip stitch into the next CH 1 space.  Fasten off and weave in those ends.  Attach your favorite button or flower to hide where the color change is apparent.

Adult
Round 13: (SC, CH 1) twice in CH 1 space, (SC, CH 1) once in next 11 CH 1 spaces.  Repeat around - 104 stitches
Round 14: (SC, CH 1) twice in CH 1 space, (SC, CH 1) once in next 12 CH 1 spaces.  Repeat around - 112 stitches
Round 15: (SC, CH 1) twice in CH 1 space, (SC, CH 1) once in next 13 CH 1 spaces.  Repeat around - 120 stitches
Rounds 16-31: (SC, CH 1) once in each CH 1 space around - 120 stitches
Rounds 32-37: Change to color B, (SC, CH 1) once in each CH 1 space around - 120 stitches
Round 38: Change back to color A, (SC, CH 1) once in each CH 1 space around - 120 stitches
Rounds 39-40: Switch to "I" size hook, (SC, CH 1) once in each CH 1 space around - 120 stitches
Rounds 41-45: Switch to "J" size hook, (SC, CH 1) once in each CH 1 space around - 120 stitches

Slip stitch into the next CH 1 space.  Fasten off and weave in those ends.  Attach your favorite button or flower to hide where the color change is apparent.


It really is a cute hat.  I think I might rip it back to do the child size for my niece in the spring.  I jokingly asked my son if he wanted it, to which I received the response "eew, that's a girl hat".  Can't argue with that.

Thursday, September 18, 2014

Been Busy

Wow!  I have not been on here in a very long while.  Sadly, I have not had the time to do much yarning over the past months.  The summer here was just beautiful, and most of my time was spent outside with my son.  I live in a city that normally gets incredibly hot and humid between June and September, so it feels like we spend more time inside in the air conditioning than outside.  But not this year - this year was perfect.  

I also spent time doing some much needed home improvements.  I had to tear down the tile in my shower, walls and all, and put up new.  Let me tell you, that was NOT fun, and took way more time than I had anticipated.  I hope I did a good job so I never have to do that again.  I then had to paint one side of my house, which was more fun than the tiling job, but it was time consuming.  I still can't believe I didn't know the house's exterior was wood when I bought it - I thought it had siding.  I guess the previous owner did a better job of keeping up with the painting than I do.

And, on top of all that, I got a kitten.  So, no yarn for me unless she is sleeping.  I may think she is happily distracted rolling a ball around or playing with a paper bag, but as soon as I get started on something, she comes running.  I swear she can hear me pull the yarn out of the skein.  But I did manage to make her a nice squishy bed, and use up some unpleasant yarn from my stash as well.

I shouldn't say "unpleasant" - I actually LOVE this yarn.  It is beautifully colored, soft, thick, and squishy.  The problem is that it is so hard to work with (for me).  The yarn I am speaking of is Lion Brand Homespun.  Crocheting with it is darn near impossible.  It is so hard to see the stitches because the yarn is bumpy, but the bumpiness is what makes it such a beautiful yarn.  

I bought alot of Homespun yarn thinking I would make a nice bulky sweater-type coat with it (still have yet to make myself a sweater).  And then I found some on sale and bought more.  And THEN I worked with it.  Never buy alot of yarn without knowing how you like working with it.  I have crocheted a few things with it - a set of coasters, an infinity scarf, and some mug cozies.  It works up really quick, and is a great yarn if missing a few stitches here or there doesn't matter.  Don't try to pull back to fix them - odds are the yarn will be knotted up.  But, because of the bumpiness of the yarn, you can't see the mistakes anyway:)

So I decided to try to knit with it.  It is much easier than crocheting, but I knit tightly so it is tricky for me to not split the yarn with the needle.  And there is no stretch to this yarn.  I really had to concentrate on loosening up.  But I managed to use up a couple of skeins out of my stash and give my little kitty a super cozy bed.


This cat bed is so squishy, I thought about making one for myself!  I made it extra think because the floors will get very cold here this winter.  It is so easy to make, too.  I didn't want to use any stuffing because I want to put it in the washing machine without getting all lumpy.  So, I just knitted in garter stitch to make what looks like a big rectangle with the corners cut out.  Fold in half and roll the sides up together to make a bed with 3 rolled sides.

I made this a few months ago, and I seem to have forgotten to make a note of how much yarn I used.  But, I think it was about 2-1/2 skeins.  Here is the pattern.


SQUISHY CAT BED

Finished size is 18" x 10".

Materials:
Lion Brand Homespun - 2-1/2 skeins
Size 11 (8.0 mm) circular knitting needles (used like straight needles)
Sewing needle

Holding 2 strands of yarn together, cast on 60 
Rows 1-20: Knit each stitch.
Row 21: Add 12 new stitches to beginning of row.  Knit to the end of row.  (here's how)
Row 22: Add 12 new stitches to beginning of row.  Knit to the end of row.
Rows 23-90: Knit each stitch.
Row 91: Cast off 12 stitches.  Knit remaining stitches to end of row.
Row 92: Cast off 12 stitches.  Knit remaining stitches to end of row.
Rows 93-113: Knit each stitch.
Cast off

This is what you should have (except made out of yarn and not paper).  Fold in half and sew together.  

Now, roll up the 3 sides that stick out and sew to the bottom of the bed.  

Sew along the corners to hold together.  Weave in ends.  Done!


Thursday, March 27, 2014

Where Have All the Lambs Gone?

So winter doesn't want to end this year.  Fine.  March came in like a lion and is going out like a... lion.  I decided to crochet a scarf in an effort to bring on some spring.  I chose the thickest yarn in my stash in a nice winter-ish color.  It's been washed and is drying as I write.  So while I do look forward to wearing it tomorrow, I hope I have tempted fate enough to bring me some spring!


Eternal Winter Infinity Scarf


I figured I had to make an infinity scarf to go along with this never-ending winter.  It is made without joining, in the spiral fashion, for a no-seam look (just as winter gave us no breaks).  I love how it looks like a big, thick, squishy knit when it is actually crocheted. 

This scarf is so stinking easy and fast to make.  And once you get past counting the chain, barely any brain cells are needed.  It does require knowing how to place the hook in the right spot though, so some who have never done this might have a hard time seeing the difference in loops.   

For this pattern, don't put your hook in the "V" like normal.  There is actually another loop in the back of the stitch under the "V".  This is where you are going to be inserting your hook. Then complete the stitch as normal.  This way, you are pushing the "V" down and towards you, which is what creates the knit look.

It looks really good using thinner yarn and a smaller hook also.


I typically like my scarves a bit thinner than most, but this pattern can be easily modified to be longer (more starting chains), shorter (fewer starting chains), wider (more rows), or thinner (fewer rows).  The only thing that matters is to crochet into that back bottom loop of the half-double crochet to keep the knit look.  And the stitches all have to be going in the same direction, so no turning for this pattern.  


ETERNAL WINTER INFINITY SCARF

Measures almost 5 inches wide and 54 inches around.

Stuff I Used:
1 entire skein Lion Brand Wool Ease Thick and Quick
Size P hook, 11-1/2 mm
Yarn needle

Stitches used: ss - slip stitch, sc - single crochet, hdc - half-double crochet
                          special - place hook in back bottom loop of stitch, not in the "v"

Ch 75.  Join with a ss in first chain.  Do not ch 1.
Round 1:  hdc in same ch as join.  hdc in each ch around.  Do not join.
Rounds 2-7:  hdc special of first hdc of last round, and in each hdc around.
Round 8: sc special in first hdc, loosely ss special in each hdc around.  

Done!  Fasten off and weave in those annoying ends.


Wednesday, March 26, 2014

IT'S MARCH 26th...

And I woke up to freshly fallen snow and temperatures in the teens.  This winter was crazy harsh, and yes, winter is supposed to be cold and snowy.  I get that.  But this one was particularly unrelenting.  It is now "supposed" to be spring, but apparently mother nature forgot to check her calendar.  So I am going to make a nice warm scarf today in the hopes that it will finally put a stop to this nonsense.

Wednesday, March 12, 2014

Soft as a Cloud Baby Blanket

I managed to finish the baby blanket for my new niece/nephew.  I started it thinking my sister-in-law was due at the end of March, but she is actually due right now.  I don't know how I messed that up.  I knitted for almost 2 weeks straight and got it done in time.  I haven't knitted anything in months, and it is always awkward to get started after crocheting so much, so I really can't believe I finished it.  My brother lives 6 hours away, and I didn't want to pay for shipping so I had to get it done before my mom left town to visit them. 


The pattern is by Laura Polley, and I found it on Ravelry.  It is so soft and squishy.  I think I might make one as a throw for the couch.  The pattern was simple enough for a beginner - just a lot of counting.  I would definitely recommend this to others and will make it again.

Thursday, February 27, 2014

New Project Excitement


Last night I finally decided on what to make for my new niece/nephew.  I couldn't sleep last night because I was so excited to get started, so I think that is a good sign that I decided on the right thing.  

I found the pattern on Ravelry, called "Soft-as-a-Cloud Baby Afghan" by Laura Polley.  

  
It is exactly what I was looking for - nothing crazy, yet interesting to look at.  I love lacy blankets, but not for babies.  A family friend knitted my son a beautiful blanket with eyelets in it, and my little guy would stick his tiny little fingers in there and got it messed up a bit.  I ended up putting it away, which was a bummer.  

Well, I had to buy yarn today, the first time in months.  I didn't have enough of any one neutral color.  I got some Bernat Softee Baby in Antique White.  I don't know if I love the color, but my sister-in-law isn't really a green or yellow person.  And there aren't too many options left after that.  Although gray seems to be showing up everywhere as a neutral , I think it might end up as a passing fad.

I can't wait to get started on this tonight.  I just started watching Scandal on Netflix.  Everyone seems to like it so I thought I would give it a shot.  The first episode was pretty good, not really what I was expecting.  So after my kiddo goes to bed, it is just me, Scandal, and my needles. Woo Hoo!

Wednesday, February 19, 2014

The Olympics

I have been completely obsessed with the Olympics this year.  I have never been like this before.  Nothing around the house is getting done.  My son is pretty into it too, which doesn't help matters.  It's so funny; we have been sitting on the couch watching other people exercise.  

I've never really listened to the Olympics before, and I think that's the difference this time around.  The announcers make everything sound so exciting.  I realized I was hooked when I was watching cross country skiing, something I had always found incredibly boring.  Boy was I wrong!  Those announcers are shouting about this and that and I can't look away.   And Short Track, I can't begin to express my love for you.  My stomach is in knots as the skaters race around and around that small oval.  

So, thankfully, the Olympics will be over soon and I can turn off the TV and get back to things. My fingers have been itching to get something into production for my new niece or nephew due in a few weeks. Time is running short, and I haven't even decided what to make, much less found a pattern.  My sister-in-law is a quilter, so I don't think I should make a blanket, as I am sure she has made a beautiful one of her own.  But, maybe.  You really can't have too many blankets I don't think.  Looking to do something classy and timeless.  I will have to tear my eyes away from the Games and start perusing Pinterest and Ravelry and see what I can come up with.

Wednesday, January 29, 2014

Gracie's Hat


Here is the pattern for the hat I made for Michelle's new daughter, Gracie.  It is a very simple pattern.  Doesn't require much counting, but isn't as boring as a plain single crochet hat.   Once done with the increase rounds it is an absolute breeze.  I wrote up a pattern for newborn, baby and child.  This hat has a lot of stretch to it, so keep that in mind.  There are a couple of pictures with notes after the newborn size pattern to help with any confusion.


Stuff I used:
Clover I - 5.5 mm hook
Clover H - 5 mm hook
Caron Simply Soft color Off White
Stitch Marker

Gauge:  End of Round 5 should measure around 3.75" across flat circle.

Throughout the pattern: All stitches are made into the single crochet stitches; the double crochet stitches are ignored.  Join each round with a slip stitch into the first single crochet stitch of that round, NOT the chain-1.  Do NOT turn.  When starting a new round, the first cluster goes into the same stitch as the join from previous round.  The last round is done using the smaller size hook.  

I recommend marking your first single crochet of each round, especially through the increase rounds, to make it easier to see the beginning of the round.

Special stitches: CL - cluster- (sc, dc, dc) all in same stitch
                                
Newborn: About 12" finished circumference

Using I hook, Make a ring
Round 1:   Ch 1, *sc, dc, dc* repeat 3 more times in ring.  Join - 12 stitches
Round 2:   Ch 1, 2 CL in each sc around.  Join - 8 clusters
Round 3:   Ch 1, *2 CL in sc, 1 CL in next sc* repeat around.  Join - 12 clusters
Round 4:   Ch 1, *1 CL in sc, 1 CL in next sc, 2 CL in next sc* repeat around.  Join - 16                                   clusters 
Rounds 5-14:  Ch 1, 1 Cluster in each sc around.  Join - 16 clusters

Change to H hook


Round 15:  Ch 1, sc in same stitch as join.  5 dc in next sc, *sc in next sc, 5 dc in next sc* repeat around.  Join - 8 shells.

Your done! Fasten off and weave in those ends.


It does look a bit like a flower in the beginning, but rounds out after all the increases


Baby: About 14" finished circumference

Using I hook, Make a ring
Round 1:   Ch 1, *sc, dc, dc* repeat 3 more times in ring.  Join in sc - 12 stitches
Round 2:   Ch 1, 2 CL in each sc around.  Join - 8 clusters
Round 3:   Ch 1, *2 CL in sc, 1 CL in next sc* repeat around.  Join - 12 clusters
Round 4:   Ch 1, *1 CL in sc, 1 CL in next sc, 2 CL in next sc* repeat around.  Join - 16                                   clusters
Round 5:   Ch 1, 1 CL in each sc around, join - 16 clusters
Round 6:   Ch 1, *1 CL in sc, 2 CL in next sc, 1 CL in each of next 2 sc* repeat around.  Join -                       20 clusters
Rounds 7- 18:  Ch 1, 1 CL in each sc around.  Join - 20 clusters

Change to H hook

Round 19:  Ch 1, sc in same stitch as join.  5 dc in next sc, *sc in next sc, 5 dc in next sc*                                 repeat around. Join - 10 shells

Your done! Fasten off and weave in those ends.


Child: About 17" finished circumference

Using I hook, Make a ring
Round 1:   Ch 1, *sc, dc, dc* repeat 3 more times in ring.  Join - 12 stitches
Round 2:   Ch 1, 2 CL in each sc around.  Join - 8 clusters
Round 3:   Ch 1, *2 CL in sc, 1 CL in next sc* repeat around.  Join - 12 clusters
Round 4:   Ch 1, *1 CL in sc, 1 CL in next sc, 2 CL in next sc* repeat around.  Join - 16                                   clusters
Round 5:   Ch 1, 1 CL in each sc around, join - 16 clusters
Round 6:   Ch 1, *1 CL in sc, 2 CL in next sc, 1 CL in each of next 2 sc* repeat around.  Join -                       20 clusters
Round 7:   Ch 1, 1 CL in each sc around.  Join - 20 clusters
Round 8:   Ch 1, *1 CL in each of next 4 sc, 2 CL in next sc* repeat around.  Join - 24 clusters
Rounds 9-22:  Ch1, 1 CL in each sc around.  Join - 24 clusters

Change to H hook

Round 23:  Ch 1, sc in same stitch as join.  5 dc in next sc, *sc in next sc, 5 dc in next sc*                                 repeat around.  Join - 12 shells

Your done! Fasten off and weave in those ends.