Pages

Wednesday, November 19, 2014

Finishing the Unfinished

Looking for something quick to finish before my son is off school next week.  So, I figure this is the perfect time to pick up something that has been laying around unfinished.  I found a Kindle cover I had started making that just needed to be sewed up.  


I had made the same exact cover for my mom a while back, and one of her friends said she really liked it.  So I started to make one as a present - LAST YEAR.  It is very easy to never finish something when no one even knows you are making it.  I should start keeping things on display until they are completed so people can bug me about finishing them.

I came up with this pattern when I was playing around with the star stitch with some Caron Simply Soft in the color Baby Brights Ombre.  I found if you do it just right, you get nice stripes without having to do color changes (no color changes = much fewer ends to weave in = I'm a happier person).  

I love the way it came out, but, the project is harder than it should be.  The stitch pattern itself is quite simple, but the coloring of the yarn made it a bit cumbersome.  The yellow and orange sections of yarn are just a bit longer than the rest (you can see how the yellow stripes kind of bow out in the picture), so you have to really play with your tension to get the striped effect. 

All you do is make a rectangle by crocheting the star stitch.  If you have never done the star stitch before, I will tell you it is very easy once you learn it.  It is made through a combination of 2 rows. Once you learn the 2 rows, you are good to go. There are many tutorials online that show how it is done.  Unfortunately, they are are some differences depending on where you look.  This is how I did the star stitch:

Make a foundation chain in a multiple of 2 plus 3 extra
ROW 1:
Beginning star:   Insert hook into 2nd chain from hook, yarn over and pull up a loop. Keep both loops on the hook.  Insert hook into next chain, yarn over and pull up a loop.  Keep three loops on hook.  Continue this way in the next 3 chains.  You now have 6 loops on hook. Yarn over and pull through all 6 loops.  Chain 1 to close the stitch. 
Rest of stars to end of row:  To start the next stitch (and each stitch after), insert your hook into the center of the star just made (where you just chained 1), yarn over and pull up a loop, keeping both loops on hook.  Next, insert hook under the last spoke of the star just made (actually going through the stitch), yarn over and pull up a loop, keeping 3 loops on hook.  Then insert hook into same chain that the last spoke of previous star used, yarn over and pull up a loop, keeping 4 loops on hook.  Then insert hook into each of the next 2 chains, yarning over and pulling up a loop as you go.  Yarn over and pull through all 6 loops on hook.  Chain 1 to close stitch.  Continue this way making stars until last chain in row.  1 HDC in last chain.  Turn.
Row 2 and all even numbered rowsChain 2.  2 HDC's in each center of star across.  1 HDC in last stitch in row  (which is the first spoke of first star in previous row).  Turn.
Row 3 and rest of odd numbered rows:  Chain 3.  Insert hook into 2nd chain from the hook and pull up a loop.  Pull up a loop through the next chain and next 3 stitches, keeping all loops on hook.  Yarn over and pull through all 6 loops on hook.  Chain 1 to close the stitch.  As done in row 1, start the next stitch (and each stitch after) by inserting hook into center of star just made and pulling up a loop.  Pull up a loop through last spoke of star just made.  Pull up a loop through same HDC the last spoke of previous star used.  Pull up a loop through each of next 2 HDC's.  Yarn over and pull through all 6 loops on hook.  Chain 1 to close stitch.  Continue making stars along row until reaching the last stitch (the chain 2 from previous row).  1 HDC in last stitch.  Turn.
Rows 4 - end:  Continue alternating rows 2 and 3, ending with row 2. 

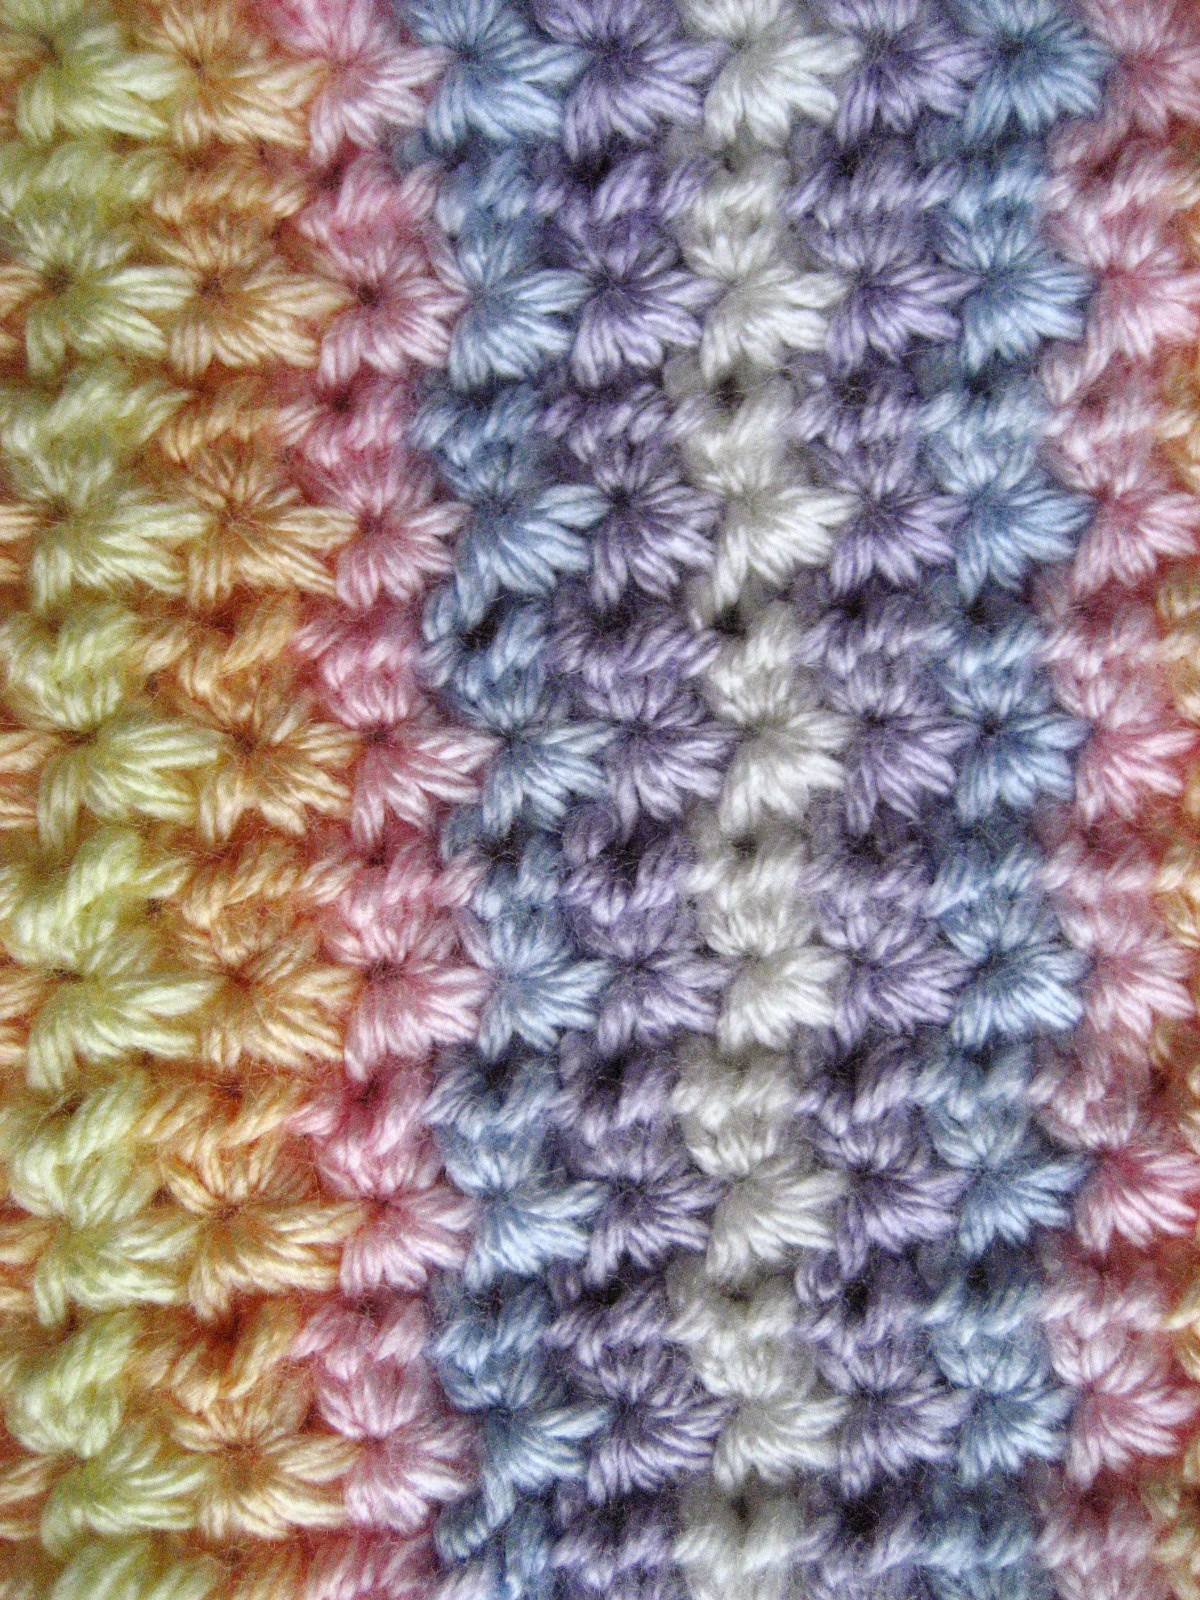
You will see that the pattern actually makes the color stripes go vertically.  I made my piece wider and shorter because I wanted the stripes to go horizontally when I sewed it all together (the picture of the long rectangle is the piece turned sideways).

For this particular piece, I used Caron Simply Soft color Baby Brights Ombre.  With a size G hook, I made a chain of 113 so that last chain on the hook is the beginning of the purple segment after the white And I worked through 20 rows.  After completing the rectangle, I attached white yarn to the white edge and put (SC, 2HDC, SC) in the spot that lined up with the center of each star across to make a nicer edge.  I then folded it so the stripes lined up from front to back and sewed it together, leaving a flap at the top to fold over.  When I made my mom's, I made a band to tuck the flap into, but I think I will just put a couple buttons on this one.

You can make other sized objects as well, just turn the work at the right color.  The color pattern is: yellow, orange, pink, blue, purple, white, purple, blue, pink, orange, yellow, orange... The color pattern turns on itself at yellow and white, so that is where you need to turn the object you are making to keep the rows.  But keep in mind that this stitch creates a denser, stiffer fabric.

Can you use other variegated yarns and achieve the same results?  I don't know.  The color pattern of the yarn would have to reverse itself like Caron's does.  And Caron's color segments each measure about 6" when pulled tight, so if the segments of another yarn match up, it should work, or change your hook size to make it work.  

Thursday, November 13, 2014

Happy Birthday, Sis!

Since I already had some purple yarn out for that owl hat, I figured it would work up into a great hat for my sister.  I planned on it being a Christmas present, but since I finished it in time (and since I have no self control), I decided to give it to her as a birthday present.  I absolutely LOVE it! 
Now, the pattern for this hat looks a bit wordy and confusing, but I promise you it is super easy.  So, don't scroll down to the free pattern yet.  Let me explain something first.  This is the kind of pattern where you can see what you are supposed to do while you are doing it (you may find you don't really need the pattern anymore once you get going).  For the most part, everything is done in the same place from previous rounds: FPDC's go around FPDC's, V-Puff's go into V-Puffs, ESC's in ESC's.  So after the increases, it is really a simple pattern -  3 ESC's, 2 FPDC's, 3 ESC's, V-Puff...  


But what the heck is an ESC?  I know!  This is the first time I have ever needed to use an extended single crochet stitch.  It is basically a stitch that starts like a single crochet, but finishes kinda like a double.  
EXTENDED SINGLE CROCHET:
1.) Insert your hook into the specific stitch, pull up a loop, and yarn over (just like single crochet)
2.) But now only pull that yarn over through 1 loop on your hook, not both (2 loops left on hook).
3.) Then you yarn over again and pull through both loops on your hook.  

I had to use the ESC because the half-double and double crochet didn't work for me.  The half-double makes everything go on a diagonal when worked in the round, which I didn't want for this hat.  And the double crochet was too tall and made the FPDC ribs curl.  Now, the double crochet stitch might work for others, as we all use our hook a bit differently, but for me it was too tall.  So if you would rather try that then go ahead, but the ESC is really easy to do.

FRONT-POST DOUBLE CROCHET:
1.) Yarn over and on the right side of the designated stitch, insert hook from the front of your work through to the back.  Go around the stitch you are working by bringing the hook back out to the front and on the left side of the stitch.  The "post" of the stitch will be on your hook.
2.) Pull up a loop by yarning over and pulling your hook out of the stitch.
3.) Yarn over and pull through only 2 loops on hook
4.) Yarn over and pull through 2 remaining loops on your hook.


There are conflicting instructions on how to do a Puff stitch, so, just to make sure there is no confusion, this is how I do the Puff stitch for this hat.  
PUFF STITCH
1.) Yarn over, insert hook into designated stitch, pull up a loop (3 loops on hook), 
2.) Yarn over again, re-insert hook into same stitch, pull up a loop (5 loops on hook), 
3.) Yarn over again, re-insert hook into same stitch again, pull up a loop, (7 loops on hook), 
4.) Yarn over and pull through all 7 loops on your hook. 
5.) Chain 1 to close the stitch.


To make the V-PUFF starting in round 6 (see picture at the end of pattern): 
1.) Insert hook in chain space between the 2 puffs from 2 rounds previous
2.) Make a puff stitch
3.) Chain 1 more time
4.) Make another puff stitch in same place


One final thought; this hat was made to be a bit slouchy, not too much.  If you want it slouchier, just make it longer by repeating the pattern rounds a couple more times.  If you don't want it to slouch at all, but rather have a tighter fitting hat, I would suggest stopping at round 21 (maybe 23) and then moving on to the ribbing.  

Here we go with the free pattern.  There are pictures at the end to help with any confusion.

MEGHAN'S HAT (Adult size only)

Materials:
1 skein Caron Simply Soft, color Plum Perfect
size H 5mm crochet hook 
size E 3.5mm crochet hook
stitch marker (optional)
yarn needle

Abbreviations:
CH - chain
SC - single crochet
ESC - extended single crochet
FPDC - front post double crochet


Using H hook, Make a ring
Round 1: SC 8 into ring, join in first sc made.  DON'T pull the ring all the way closed yet.

Round 2: CH 3, *Puff stitch into ring, CH 1 again* 6 times.  Join into top of first Puff made.  Now pull the ring closed.  6 Puff stitches made.  If you want to count the stitches, you should have 17. 

Round 3: CH 1, ESC in same stitch, 2 ESC's in Chain space, *ESC in top of next Puff stitch, 2 ESC's in next Chain space* repeat around.  Join in first ESC.  18 stitches.

Round 4: CH 3, Puff stitch into Chain space from round 2, CH 1, Puff stitch into same space, CH 1, *Puff stitch into next Chain space, CH 1, Puff stitch into same space, CH 1* repeat around.  Join into top of first Puff made.  12 Puff stitches made.  35 stitches.

Round 5: Ch 1, ESC in same stitch, 2 ESC's in Chain space, *ESC in top of next Puff stitch, 2 ESC's in next Chain space* repeat around.  Join in first ESC.  36 stitches.

Round 6: Slip stitch into next stitch, CH 1, 2 ESC's in same stitch as chain, 2 ESC in next stitch, skip next stitch, (Puff stitch into Chain space from round 4, CH 1, Puff stitch into same space - this creates the V-Puff), skip the next stitch, *2 ESC's in each of next 2 stitches, skip next stitch, V-Puff in next Chain space from round 4, skip next stitch* repeat around.  Join in first ESC.  6 V-Puffs made.  54 stitches.  (see picture below)

Round 7: CH 1, 2 ESC into same stitch as chain, FPDC around each of next 2 stitches, 2 ESC's in next, skip next, ESC in top of Puff, 2 ESC's in Chain space, ESC in top of next Puff, *2 ESC's in next stitch, FPDC around each of next 2 stitches, 2 ESC's in next stitch, skip next, ESC in top of Puff, 2 ESC's in Chain space, ESC in top of next Puff* repeat around.  Join into first ESC.  60 stitches.  (see picture below)

Round 8: CH 1, 2 ESC's in same stitch as chain, ESC in next stitch, FPDC around each of next 2 FPDC's, ESC in next stitch, 2 ESC's in next stitch, skip next stitch, make V-Puff in chain space from round 6, skip next stitch, *2 ESC's in next stitch, ESC in next, FPDC around each of next 2 FPDC's, ESC in next stitch, 2 ESC's in next stitch, skip next, V-Puff in chain space, skip next stitch* repeat around.  Join into first ESC.  78 stitches.

Round 9: CH 1, ESC in same stitch as chain, ESC in each of next 2 stitches, FPDC around each of next 2 FPDC's, ESC in each of next 3 stitches, skip next, ESC in top of Puff, 2 ESC's in chain space, ESC in top of next Puff, *ESC in each of next 3 stitches, FPDC around each of next 2 FPDC's, ESC in each of next 3, skip next, ESC in top of Puff, 2 ESC's in chain space, ESC in top of next Puff* repeat around. Join into first ESC.  72 stitches.

Round 10: CH 1, ESC in same stitch as chain, ESC in each of next 2 stitches, FPDC around each of next 2 FPDC's, ESC in each of next 3 stitches, skip next, V-Puff in chain space from 2 rounds previous, skip next stitch, *ESC in each of next 3 stitches, FPDC around each of next 2 FPDC's, ESC in each of next 3 stitches, skip next, V-Puff into chain space, skip next* repeat around.  Join into first ESC.  78 stitches.

Rounds 11-25: Repeat rounds 9 and 10, ending with row 9.

Round 26: Change to E hook.  Slip stitch into next stitch, CH 1, ESC in same stitch as chain, ESC in next stitch, FPDC around each of next 2 FPDC's, ESC in each of next 2 stitches, FPDC around each of next 2 stitches, ESC in each of next 2 stitches, FPDC around each of next 2 stitches.  This creates the ribbing.   Repeat *2 ESC's, 2 FPDC's* all the way around .  Join in first ESC.  72 stitches.

Rounds 27-32: CH 1, ESC in same stitch as chain, ESC in next stitch, FPDC around next 2 FPDC's, *ESC in each of next 2 ESC's, FPDC around each of next 2 FPDC's* repeat around. Join in first ESC.  72 stitches.

Done!  Fasten off and weave in those ends.  

Starting with round 6 and rest of even rounds until ribbing, to make the V-Puff:

Skip the ESC that was worked into the top of puff.

Insert hook into chain space and work the V-Puff over top the the 2 ESC's in that space.  

Skip the ESC from the top of second puff.  
Continue with ESC as written in pattern.


The puff stitch is really a modified half double crochet with an extra chain to close it, which creates 2 stitches.  The chain to close it is at the top of the puff, with the technical hdc stitch being pushed to the right and kinda hanging out unattached to anything.  Making the V-puff in this pattern will result in 5 stitches (each puff creating 2 and the extra chain 1 in the middle):


1 is technically the 1st puff stitch
2 is the chain to close
3 is the chain 1
4 is the 2nd puff stitch
5 is the chain to close

Always skip #1, so the stitch count will not be consistent, even after the increase rounds.


Starting with round 7 and rest of odd rounds until ribbing, to work ESC's in to the V-Puff:

Skip stitch #1
ESC in #2
2 ESC's in space created by #3,4 
ESC in #5

Continue with ESC as written in pattern


So, I hope you made it through without too much trauma.  That was incredibly confusing for me to write up, but I really tried to make it as clear as possible.  If I have failed, let me know and I will figure out a better way of explaining everything, because it is an AWESOME hat, and it is actually pretty fun to make.

Thursday, November 6, 2014

Yet Another Owl Hat


Well, I decided to make an owl hat out of that eyelash-ish yarn from the previous post.  I was hoping to be a bit more creative, but it just wasn't working this time.  It is pretty cute, though.  

I used Palette Collection Series 001pt/219 in color Lilac Wine, which I believed is discontinued. Holding that together with Caron Simply Soft in color Plum Perfect, I just made a typical beanie using a size N hook.  I tried it with the tassels for "ears" but it didn't look right with this yarn.  I am giving it to my niece, so I will see how it looks once it's on.  Probably won't be a good hat for the winter because the large hook made for some good size holes, but it should be good for the next month or two. 

This hat used up a little more than 1 out of the 3 balls from my stash, so there are 2 left to be dealt with, but that is for another time.